
Step-by-Step Beginner Guide to Building Your First PC for Gaming
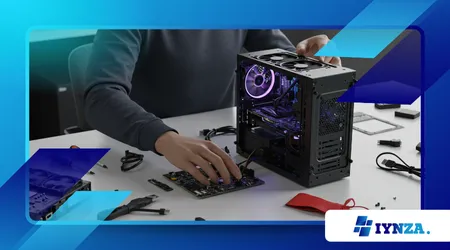
Building Your First PC for Gaming is an exhilarating journey that blends creativity, technical know-how, and the thrill of crafting something uniquely yours.
Anúncios
Imagine assembling a machine that powers epic battles in Baldur’s Gate 3 or delivers buttery-smooth frames in Cyberpunk 2077. For beginners, the process might seem daunting sockets, coolers, and compatibility charts can feel like a foreign language.
But fear not: this guide is your roadmap to constructing a gaming rig that’s both powerful and personal. With 2025’s cutting-edge hardware and a clear plan, you’ll transform from novice to PC-building maestro.
Why settle for a pre-built system when you can create a masterpiece tailored to your gaming dreams?
This guide is designed for first-timers, offering a step-by-step path to Building Your First PC for Gaming with clarity and confidence.
We’ll cover everything from choosing components to troubleshooting your first boot, ensuring each step is practical and engaging.
Expect real-world examples, a sprinkle of humor, and tips grounded in the latest tech trends. By the end, you’ll have a rig ready to tackle modern games and a newfound sense of accomplishment.
Let’s dive into the art and science of PC building, where every screw tightened is a step toward gaming glory.
Why Build Your Own Gaming PC?
Crafting your own rig offers unmatched customization. You pick the parts that match your budget and gaming goals, unlike pre-built systems’ one-size-fits-all approach.
Building Your First PC for Gaming lets you prioritize what matters maybe a beefy GPU for ray-tracing or a fast CPU for streaming.
++ The Best Aim Trainers Ranked: Which One is Worth Your Time?
Control is another perk. You decide the aesthetics, from RGB lighting to sleek minimalist cases. Plus, self-built PCs are often cheaper, saving you hundreds compared to pre-built models with similar specs.
Finally, it’s a skill-building adventure. Assembling a PC teaches problem-solving and tech literacy, empowering you to upgrade or troubleshoot later.
According to a 2024 PCMag survey, 62% of DIY builders felt more confident in tech after their first build.
Step 1: Plan Your Build and Set a Budget
Before diving into Building Your First PC for Gaming, define your goals. Are you chasing 4K visuals or aiming for high frame rates at 1080p? Your budget shapes your choices $800 can get a solid mid-range rig, while $1,500 unlocks premium performance.
Research components within your price range. Tools like PCPartPicker help check compatibility and track prices across retailers, ensuring you don’t overspend.
Also read: How to Stop Panicking During High-Stakes Fights
Start with a balanced build: don’t skimp on the GPU or CPU, but avoid overspending on flashy peripherals. A $1,200 budget might split as $400 GPU, $250 CPU, and the rest for other parts.
Step 2: Choose the Right Components
Selecting components is the heart of Building Your First PC for Gaming. Each part must work harmoniously think of it like assembling a band, where every instrument plays a role. Here’s a breakdown of key components:
- CPU: The brain, handling game logic and multitasking. AMD Ryzen 5 7600X or Intel Core i5-14400F are great mid-range picks for 2025.
- GPU: The artist, rendering visuals. NVIDIA RTX 4060 Ti or AMD RX 7700 XT balance price and performance for 1440p gaming.
- Motherboard: The backbone, connecting everything. Ensure socket compatibility (e.g., AM5 for Ryzen 7000 series).
- RAM: Short-term memory for smooth gameplay. 16GB DDR5 at 5200MHz is ideal for 2025 titles.
- Storage: SSDs for fast load times. A 1TB NVMe SSD like the Samsung 990 Pro is a solid choice.
- PSU: Powers the rig. Aim for 650W-750W with 80+ Gold certification for efficiency.
- Case: Your rig’s home. Choose one with good airflow, like the NZXT H5 Flow.
Compatibility Is Key
Mismatched parts can derail your build. Double-check CPU socket, GPU size, and PSU wattage. For example, a Ryzen 7 7700X needs an AM5 motherboard, not AM4.
Use online tools to verify compatibility. A common rookie mistake is pairing a high-end GPU with a weak CPU, bottlenecking performance. Balance is everything.
Read more: Niche Game Mode Guides: Mastering Battle Royale vs MMORPG Strategies for Pro Gamers
Example: Budget vs. Premium Build
Consider two builds: Jake, a college student, builds a $900 rig with a Ryzen 5 7600 and RTX 4060 for 1080p gaming.
Sarah, a streamer, invests $1,800 in a Ryzen 7 7800X3D and RTX 4070 Ti for 1440p streaming. Both prioritize balance but cater to different needs.
| Component | Budget Build ($900) | Premium Build ($1,800) |
|---|---|---|
| CPU | Ryzen 5 7600 ($200) | Ryzen 7 7800X3D ($400) |
| GPU | RTX 4060 ($300) | RTX 4070 Ti ($700) |
| Motherboard | B650M ($120) | X670E ($250) |
| RAM | 16GB DDR5 ($70) | 32GB DDR5 ($140) |
| Storage | 1TB NVMe SSD ($80) | 2TB NVMe SSD ($150) |
| PSU | 650W 80+ Gold ($70) | 750W 80+ Gold ($100) |
| Case | NZXT H5 Flow ($60) | Lian Li PC-O11 ($160) |
Step 3: Prepare Your Workspace and Tools
A clutter-free workspace prevents lost screws or static damage. Clear a large table, use an anti-static mat, and ground yourself with a wrist strap.
You’ll need a Phillips screwdriver, cable ties, and thermal paste (often included with coolers). Keep your motherboard manual handy it’s your build’s Bible.
Organize components by type before starting. This small step saves time and reduces stress, especially when you’re deep in Building Your First PC for Gaming.
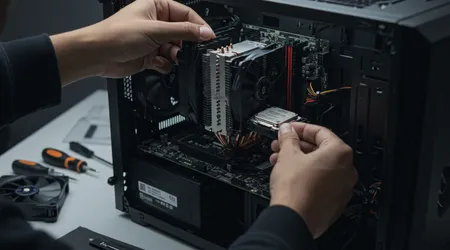
Step 4: Assemble the Core Components
Start with the motherboard outside the case for easier access. Install the CPU gently, aligning the chip’s notches with the socket’s pins force is your enemy.
Next, apply a pea-sized drop of thermal paste and attach the cooler. Secure the RAM by pressing firmly until it clicks into place.
Mount the motherboard in the case, aligning it with standoffs to avoid short-circuiting. Tighten screws evenly but don’t overtighten think firm handshake, not vise grip.
Handling Delicate Parts
CPUs and motherboards are fragile. Handle them by the edges, avoiding pins or sockets. For example, bending pins on an AMD Ryzen chip can ruin it.
If you’re using an AIO liquid cooler, ensure radiator fans promote airflow. Misaligned fans can choke your system, reducing performance.
First Build Jitters
Nervous about your first assembly? Picture Building Your First PC for Gaming like solving a puzzle each piece fits logically. Take breaks if frustrated; rushing leads to mistakes.
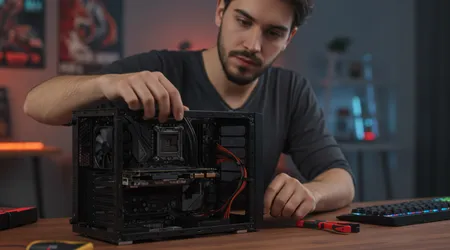
Step 5: Install the GPU and Storage
Slot the GPU into the PCIe slot, ensuring it clicks securely. Connect power cables from the PSU modern GPUs often need 8-pin connectors.
Mount the SSD on the motherboard’s M.2 slot or a case bay. NVMe SSDs screw directly onto the board; SATA drives need cables.
Double-check connections. Loose cables can cause boot failures, a common issue when Building Your First PC for Gaming.
Avoiding Common Pitfalls
Don’t force the GPU into the slot; align it carefully. Similarly, ensure M.2 screws are snug but not stripped overtightening can damage threads.
If your SSD isn’t detected later, recheck the slot and cables. A loose M.2 drive once cost me an hour of troubleshooting learn from my mistake!
Step 6: Connect the Power Supply and Cables
The PSU is your rig’s lifeline. Install it in the case’s bottom or top bay, then connect the 24-pin motherboard cable and 8-pin CPU power cable.
Route cables neatly using case channels to improve airflow and aesthetics. Cable management isn’t just pretty it prevents overheating.
Test connections before powering on. A loose PSU cable can halt Building Your First PC for Gaming in its tracks.
Cable Management Tips
Use zip ties to bundle cables, keeping them away from fans. For example, Sarah’s premium build looked chaotic until she organized cables, boosting airflow.
Invest in a modular PSU if budget allows. It reduces cable clutter, making your first build cleaner and easier to manage.
Step 7: Boot Up and Install the OS
Power on your PC. If it doesn’t boot, check connections and ensure the PSU switch is on. A successful POST (Power-On Self-Test) means you’re golden.
Install Windows 11 from a USB drive, following prompts to set up. Download drivers from your GPU and motherboard manufacturers’ websites for optimal performance.
This is the moment Building Your First PC for Gaming feels real seeing the BIOS screen is like hearing your rig’s first heartbeat.
Troubleshooting First Boot
No display? Reseat the GPU and check monitor cables. If the system beeps, consult your motherboard manual for error codes. Patience is key.
For example, Jake’s budget build failed to boot until he realized the RAM wasn’t fully seated. A quick reseat fixed it instantly.
Step 8: Optimize for Gaming Performance
Update your GPU drivers to unlock full performance NVIDIA’s GeForce Experience simplifies this. Overclock cautiously using tools like MSI Afterburner for extra FPS.
Adjust Windows settings: disable unnecessary startup programs and enable Game Mode for smoother gameplay. Test with a game like Fortnite to ensure stability.
Fine-tuning ensures Building Your First PC for Gaming delivers the experience you envisioned—crisp visuals and lag-free action.
Benchmarking Your Rig
Use tools like 3DMark to measure performance. Compare scores to similar builds online to ensure your rig is hitting expected marks.
If performance lags, check thermals. High CPU temps (above 85°C) during gaming signal cooling issues, often fixed by reapplying thermal paste.
Step 9: Future-Proofing Your Build
Plan for upgrades. A B650 motherboard supports future Ryzen CPUs, extending your rig’s lifespan. Choose a PSU with extra wattage for GPU upgrades.
Keep software updated Windows patches and driver updates prevent compatibility issues. Regular maintenance keeps your rig ready for 2026’s games.
Building Your First PC for Gaming isn’t a one-and-done task; it’s the start of a journey to keep your system cutting-edge.
Upgrade Paths
In two years, swap your RTX 4060 for an RTX 5060 for better ray-tracing. Adding more RAM is another easy upgrade for multitasking.
Monitor tech trends. For instance, DDR6 RAM might debut by 2027, so choose a motherboard with forward-compatible slots if possible.
Conclusion: Your Gaming Journey Begins
Building Your First PC for Gaming is more than assembling parts it’s crafting a portal to immersive worlds. From picking components to booting up, each step builds your confidence and skills.
Your rig, whether a budget beast or a premium powerhouse, reflects your vision. What’s stopping you from starting today? Dive in, tweak, and game on your custom-built PC awaits.
This process is like baking a cake: each ingredient (component) matters, but the magic happens when they blend perfectly.
With patience and this guide, you’ve created a machine ready for 2025’s gaming challenges. Share your build’s story in the comments what games will you conquer first?
Frequently Asked Questions
Q: How long does it take to build a gaming PC?
A: For beginners, Building Your First PC for Gaming takes 3-5 hours, including setup and troubleshooting. Experienced builders may finish in 2 hours.
Q: Can I build a gaming PC on a tight budget?
A: Absolutely. A $700-$900 build with a Ryzen 5 and RTX 4060 delivers solid 1080p performance. Prioritize GPU and CPU in your budget.
Q: What if my PC doesn’t boot?
A: Check power connections, reseat RAM and GPU, and consult your motherboard manual for beep codes. Most issues stem from loose components.
Q: Do I need liquid cooling for gaming?
A: Not always. Air coolers like the Noctua NH-U12S suffice for mid-range builds. Liquid cooling is ideal for high-end CPUs or overclocking.
Q: How often should I update my PC?
A: Upgrade key components (GPU, CPU) every 2-3 years to keep up with new games. Regular driver updates maintain performance.